✨ Automatic DNS Merge Tool for Cloudflare & cPanel/Domain Verification (Accurate & Fast)
🔗 Merge DNS Records
Merge DNS records from Domain Verification into Cloudflare zone file
📋 Instructions:
- File 1: Export DNS records from Cloudflare (.txt format)
- File 2: Export from Domain Verification to configure email (.csv format)
- After uploading both files, click the button to download the merged file
💡 The Big Problem: Manual DNS Entry for Email Configuration
Are you in the process of migrating or setting up a new Email Server service (like Google Workspace, Zoho Mail, or a private Email Server) and facing the task of configuring numerous DNS records on Cloudflare?
Typically, the provider gives you a CSV file or a long list of necessary records, including MX (Mail Exchanger), TXT (SPF/DKIM/DMARC), and A records, which you must manually add to your DNS Zone.
The issues with the manual process:
- ❌ Time-Consuming: You have to copy each record one by one, manually entering the name, selecting the type, inputting the content, and setting the TTL.
- ❌ Error-Prone: A single typo, especially in long TXT records, can lead to email service failure or cause your emails to be marked as spam.
- ❌ Long TXT Records: Cloudflare (and DNS standards) require long TXT records to be split into multiple character strings (max 255 characters each). Manual splitting is tedious and a source of errors.
🔗 Introducing the Cloudflare & Domain Verification DNS Merge Tool
We developed the Automatic Cloudflare DNS Merge Tool to completely eliminate these problems. This tool is specifically engineered to intelligently combine your two DNS data sources into one single, valid BIND Zone file, ready for immediate import into Cloudflare in less than a minute.
How it works: The tool takes the new Email configuration records (MX, TXT, A) from your Domain Verification File (CSV) and injects them into your existing Cloudflare DNS File (.TXT), all while checking for and avoiding duplicate records.
📋 3 Simple Steps to Merge and Import Your DNS Records
You only need to prepare the two necessary files. Our tool will handle all the complex merging and formatting for you.
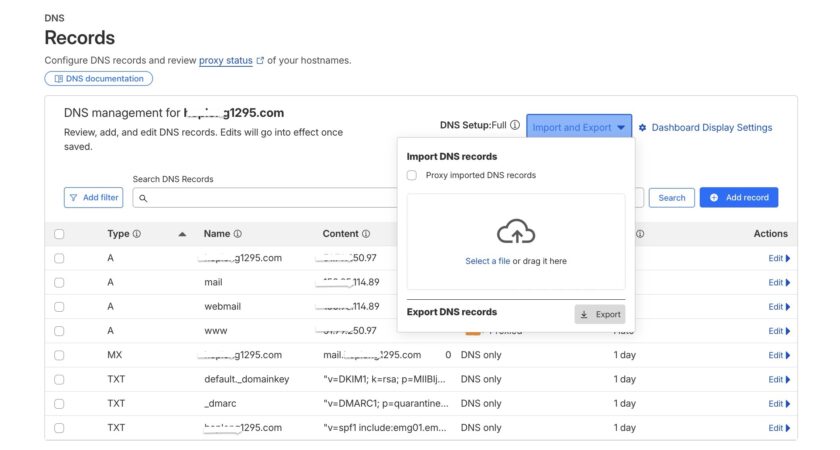
Step 1: Prepare File 1 (Existing Cloudflare DNS)
- Navigate to your DNS management page on Cloudflare.
- Locate the “Import and Export” button and select “Export DNS records”.
- Download the
.txtfile (this is your current BIND Zone file).
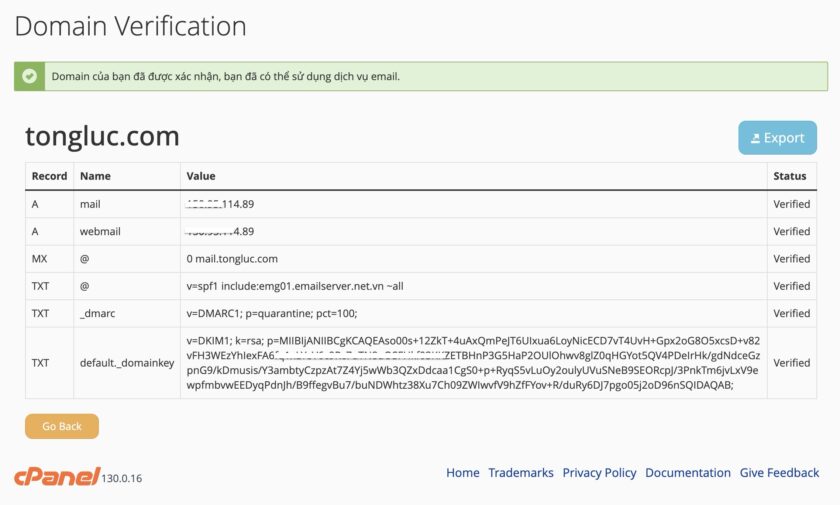
Step 2: Prepare File 2 (Domain Verification / Email Configuration)
- Access the DNS management interface of your Email provider or Domain Verification process (e.g., cPanel, where you export the email configuration list).
- Export or copy the required MX, TXT, and A records into a
.csvformatted file.- Note: The CSV file usually has a simple 3-column structure:
TYPE,NAME/HOST,VALUE/CONTENT.
- Note: The CSV file usually has a simple 3-column structure:
Step 3: Upload and Download the Merged File
Using the form below, simply upload your two prepared files and click the button:
After processing, the tool will automatically generate and download the new merged .txt file to your computer.
✅ Why Use This DNS Merge Tool?
| Feature | Benefit | Technical Optimization |
| Smart Merging | It does not delete your existing critical records; it only adds new, non-duplicating records. | merge_records logic: Checks the Record Name to prevent duplicates. |
| Automatic TXT Formatting (RFC-Compliant) | Automatically splits long TXT strings (like DKIM) into multiple shorter strings (max 255 characters), ensuring compliance with standards and Cloudflare acceptance. | convert_csv_to_bind logic: Handles the 255-character TXT record limit. |
| Record Name Normalization (Domain Sync) | Automatically appends the Domain suffix (.yourdomain.com) to relative record names, saving you the hassle of manual full domain entry. | extract_domain & convert_csv_to_bind logic: Standardizes BIND record names. |
| Optimized TTL | Assigns appropriate default TTLs (1 sec for A, 86400 sec for MX/TXT) suitable for Cloudflare. | convert_csv_to_bind logic: Sets dynamic TTL based on record type. |
| No Registration Required | Use the tool instantly without needing an account or providing personal information. | Easy access, higher conversion rate for usage. |
🛠 How to Import the Merged File to Cloudflare
- Return to your Cloudflare DNS management page.
- Click on “Import and Export” and select “Import DNS records”.
- Upload the merged
.txtfile you just downloaded from our tool. - Click “Import” to let Cloudflare automatically update all your new records.
Done! Your Email configuration records are now added to Cloudflare quickly, accurately, and without any formatting errors!
❓ Ready to experience automatic DNS merging?
Scroll up and start using the tool now to save your valuable time!